Do you want to play with your IoT devices using Bluetooth, but you cannot put any software in it? Here we are going to see how to communicate through Bluetooth with your IoT device using a phone application.
Is it for Android or iOS? Both! We are going to use Flutter as a development framework for mobile app. We are going to write an nRF connect light where we will be able to scan, connect, read and write on devices.
Note: You can find the whole code for this project at https://github.com/jenow/flutter-ble
There is no official documentation about using Bluetooth with Flutter, simply because it is not officially supported by the framework, that’s why we are going to use [flutter_blue](https://pub.dev/packages/flutter_blue) as a dependency.
If you are looking for an alternative to Firebase, Kuzzle is an open source mobile backend to store your data, manage your users and more.

Add flutter_blue as dependency
Add to your pubspec.yaml flutter_blue:
dependencies:
 flutter:
   sdk: flutter
 flutter_blue: 0.6.3+1
Note: At this day the latest version of flutter_blue is `0.6.3+1` but be sure to check if there are updates on https://pub.dev/packages/flutter_blue
Change the minSdkVersion for Android
Flutter_blue is compatible only from version 19 of Android SDK so you should change this in android/app/build.gradle:
Android {
  defaultConfig {
     minSdkVersion: 19
Add permissions for Bluetooth
We need to add the permission to use Bluetooth and access location:
Android
In the AndroidManifest.xml let’s add:
<uses-permission android:name="android.permission.BLUETOOTH" />
<uses-permission android:name="android.permission.BLUETOOTH_ADMIN" />
<uses-permission android:name="android.permission.ACCESS_COARSE_LOCATION"/>
iOS
In the Info.plist let’s add:
<key>NSBluetoothAlwaysUsageDescription</key>
<string>Need BLE permission</string>
<key>NSBluetoothPeripheralUsageDescription</key>
<string>Need BLE permission</string>
<key>NSLocationAlwaysAndWhenInUseUsageDescription</key>
<string>Need Location permission</string>
<key>NSLocationAlwaysUsageDescription</key>
<string>Need Location permission</string>
<key>NSLocationWhenInUseUsageDescription</key>
<string>Need Location permission</string>
For location permissions on iOS see more at https://developer.apple.com/documentation/corelocation/requesting_authorization_for_location_services
Let’s begin
Here is our main.dart for now:
import 'package:flutter/material.dart';

void main() => runApp(MyApp());

class MyApp extends StatelessWidget {
 @override
 Widget build(BuildContext context) => MaterialApp(
       title: 'BLE Demo',
       theme: ThemeData(
         primarySwatch: Colors.blue,
       ),
       home: MyHomePage(title: 'Flutter BLE Demo'),
     );
}

class MyHomePage extends StatefulWidget {
 MyHomePage({Key key, this.title}) : super(key: key);

 final String title;

 @override
 _MyHomePageState createState() => _MyHomePageState();
}

class _MyHomePageState extends State<MyHomePage> {
 @override
 Widget build(BuildContext context) => Scaffold(
       appBar: AppBar(
         title: Text(widget.title),
       ),
       body: Column(
         children: <Widget>[],
       ),
     );
}
Let’s import flutter_blue:
import 'package:flutter_blue/flutter_blue.dart';
And add the flutter_blue instance inside our MyHomePage widget:
final FlutterBlue flutterBlue = FlutterBlue.instance;
We will be able to access it by using the widget.flutterBlue property inside our _MyHomePageState widget.
Scanning Bluetooth devices
Now let’s start scanning for Bluetooth devices and display them in a ListView.
First let’s add a List containing our devices inside our MyHomePage class:
final List<BluetoothDevice> devicesList = new List<BluetoothDevice>();
And write a method in our _MyHomePage class which will help fill this in list:
_addDeviceTolist(final BluetoothDevice device) {
   if (!widget.devicesList.contains(device)) {
     setState(() {
       widget.devicesList.add(device);
     });
   }
 }
Now let’s fill it in by starting a scan inside the initState method of _MyHomePage:
|
⚠️ When starting a scan you will only list the devices which are not already connected. So we are also going to add the connected devices to our list by accessing the connectedDevices attribute of our FlutterBlue instance. |
 @override
 void initState() {
   super.initState();
   widget.flutterBlue.connectedDevices
       .asStream()
       .listen((List<BluetoothDevice> devices) {
     for (BluetoothDevice device in devices) {
       _addDeviceTolist(device);
     }
   });
   widget.flutterBlue.scanResults.listen((List<ScanResult> results) {
     for (ScanResult result in results) {
       _addDeviceTolist(result.device);
     }
   });
   widget.flutterBlue.startScan();
 }
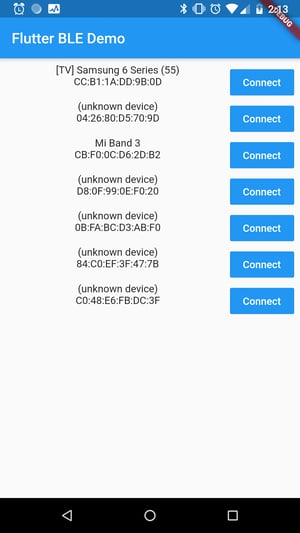
Now our List will be filled in with devices which FlutterBlue finds by scanning.
Let’s now build our ListView with the deviceList as content:
 ListView _buildListViewOfDevices() {
   List<Container> containers = new List<Container>();
   for (BluetoothDevice device in widget.devicesList) {
     containers.add(
       Container(
         height: 50,
         child: Row(
           children: <Widget>[
             Expanded(
               child: Column(
                 children: <Widget>[
                   Text(device.name == '' ? '(unknown device)' : device.name),
                   Text(device.id.toString()),
                 ],
               ),
             ),
             FlatButton(
               color: Colors.blue,
               child: Text(
                 'Connect',
                 style: TextStyle(color: Colors.white),
               ),
               onPressed: () {},
             ),
           ],
         ),
       ),
     );
   }

   return ListView(
     padding: const EdgeInsets.all(8),
     children: <Widget>[
       ...containers,
     ],
   );
 }
Assign this listView as the body of our main Scaffold:
 @override
 Widget build(BuildContext context) => Scaffold(
       appBar: AppBar(
         title: Text(widget.title),
       ),
       body: _buildListViewOfDevices(),
     );
Now we should have a list of nearby Bluetooth-enabled devices. Next we will connect to one of them and display the services and characteristics it has.
Connect to a device and display services with characteristics
For the sake of readability we will not create a new view to connect to a device but rather adapt the current content of MyHomePage to make it depend on whether we are connected or not. For that we are first going to add a function which will return the right view to display.
So let’s add a State representing the device we are connecting to and the list of services it exposes in _MyHomePageState:
 @override
 Widget build(BuildContext context) => Scaffold(
       appBar: AppBar(
         title: Text(widget.title),
       ),
       body: _buildListViewOfDevices(),
     );
And the function:
 ListView _buildView() {
   if (_connectedDevice != null) {
     return _buildConnectDeviceView();
   }
   return _buildListViewOfDevices();
 }
The _buildConnectDeviceView method which does not do so much for now:
 ListView _buildConnectDeviceView() {
   return ListView(
     padding: const EdgeInsets.all(8),
     children: <Widget>[],
   );
 }
Now our build method will return this _buildView:
 @override
 Widget build(BuildContext context) => Scaffold(
       appBar: AppBar(
         title: Text(widget.title),
       ),
       body: _buildView(),
     );
And finally we can add some logic to the onPressed method of our FlatButton where we will stop FlutterBlue’s scan, connect to the device and set this device in our previously created state _connectedDevice plus getting the services of this device and display a list.
onPressed: () {
 setState(() async {
   widget.flutterBlue.stopScan();
   try {
     await device.connect();
   } catch (e) {
     if (e.code != 'already_connected') {
       throw e;
     }
   } finally {
     _services = await device.discoverServices();
   }
   _connectedDevice = device;
 });
}
Change the _buildConnectDeviceView like so:
 ListView _buildConnectDeviceView() {
   List<Container> containers = new List<Container>();
   for (BluetoothService service in _services) {
     containers.add(
       Container(
         height: 50,
         child: Row(
           children: <Widget>[
             Expanded(
               child: Column(
                 children: <Widget>[
                   Text(service.uuid.toString()),
                 ],
               ),
             ),
           ],
         ),
       ),
     );
   }

   return ListView(
     padding: const EdgeInsets.all(8),
     children: <Widget>[
       ...containers,
     ],
   );
 }
Display characteristics
We have now a list of services at our disposal. We will display the characteristics for each service and add buttons depending on if we can read, write or notify about this feature.
Our new _buildConnectDeviceView looks like this:
 ListView _buildConnectDeviceView() {
   List<Container> containers = new List<Container>();

   for (BluetoothService service in _services) {
     List<Widget> characteristicsWidget = new List<Widget>();
     for (BluetoothCharacteristic characteristic in service.characteristics) {
       characteristic.value.listen((value) {
         print(value);
       });
       characteristicsWidget.add(
         Align(
           alignment: Alignment.centerLeft,
           child: Column(
             children: <Widget>[
               Row(
                 children: <Widget>[
                   Text(characteristic.uuid.toString(), style: TextStyle(fontWeight: FontWeight.bold)),
                 ],
               ),
               Row(
                 children: <Widget>[
                   ..._buildReadWriteNotifyButton(characteristic),
                 ],
               ),
               Divider(),
             ],
           ),
         ),
       );
     }
     containers.add(
       Container(
         child: ExpansionTile(
             title: Text(service.uuid.toString()),
             children: characteristicsWidget),
       ),
     );
   }

   return ListView(
     padding: const EdgeInsets.all(8),
     children: <Widget>[
       ...containers,
     ],
   );
 }
And we add a function computing our buttons:
 List<ButtonTheme> _buildReadWriteNotifyButton(
     BluetoothCharacteristic characteristic) {
   List<ButtonTheme> buttons = new List<ButtonTheme>();

   if (characteristic.properties.read) {
     buttons.add(
       ButtonTheme(
         minWidth: 10,
         height: 20,
         child: Padding(
           padding: const EdgeInsets.symmetric(horizontal: 4),
           child: RaisedButton(
             color: Colors.blue,
             child: Text('READ', style: TextStyle(color: Colors.white)),
             onPressed: () {},
           ),
         ),
       ),
     );
   }
   if (characteristic.properties.write) {
     buttons.add(
       ButtonTheme(
         minWidth: 10,
         height: 20,
         child: Padding(
           padding: const EdgeInsets.symmetric(horizontal: 4),
           child: RaisedButton(
             child: Text('WRITE', style: TextStyle(color: Colors.white)),
             onPressed: () {},
           ),
         ),
       ),
     );
   }
   if (characteristic.properties.notify) {
     buttons.add(
       ButtonTheme(
         minWidth: 10,
         height: 20,
         child: Padding(
           padding: const EdgeInsets.symmetric(horizontal: 4),
           child: RaisedButton(
             child: Text('NOTIFY', style: TextStyle(color: Colors.white)),
             onPressed: () {},
           ),
         ),
       ),
     );
   }

   return buttons;
 }
The result for now:
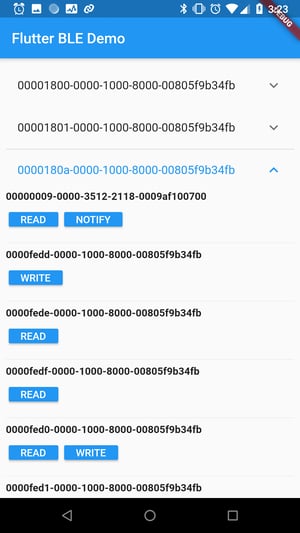
Read, write and receive notifications from a characteristic
Last step is to add logic on our read, write and notify buttons.
We will first add a Map to store our values by characteristic to be able to display them.
In our MyHomePage class let’s add the following:
final Map<Guid, List<int>> readValues = new Map<Guid, List<int>>();
Then let’s add a new Row in our _buildConnectDeviceView method to display our value:
               Row(
                 children: <Widget>[
                   Text('Value: ' +
                       widget.readValues[characteristic.uuid].toString()),
                 ],
               ),
Read
First let’s add the logic in the onPressed method of the read button:
             onPressed: () async {
               var sub = characteristic.value.listen((value) {
                 setState(() {
                   widget.readValues[characteristic.uuid] = value;
                 });
               });
               await characteristic.read();
               sub.cancel();
             },
Here we first listen on characteristic changes and store its new value in our previously created Map. It will then update our view and display the updated value.
Write
In order to send data to the device we will create a TextField field inside a dialog, link a controller to it and send its content.
So let’s add a controller to our _MyHomePageState:
final _writeController = TextEditingController();
And create our dialog with the logic inside the onPressed method of the write button:
             onPressed: () async {
               await showDialog(
                   context: context,
                   builder: (BuildContext context) {
                     return AlertDialog(
                       title: Text("Write"),
                       content: Row(
                         children: <Widget>[
                           Expanded(
                             child: TextField(
                               controller: _writeController,
                             ),
                           ),
                         ],
                       ),
                       actions: <Widget>[
                         FlatButton(
                           child: Text("Send"),
                           onPressed: () {
                             characteristic.write(utf8
                                 .encode(_writeController.value.text));
                             Navigator.pop(context);
                           },
                         ),
                         FlatButton(
                           child: Text("Cancel"),
                           onPressed: () {
                             Navigator.pop(context);
                           },
                         ),
                       ],
                     );
                   });
             },
So we simply call the characteristic’s write function with our input value passed to it, converted to a byte array using dart:convert
Notify
Notify is simply a callback executed every time the characteristic’s value handling the notifications is updated:
             onPressed: () async {
               characteristic.value.listen((value) {
                 widget.readValues[characteristic.uuid] = value;
               });
               await characteristic.setNotifyValue(true);
             },
Now every time the value of this characteristic changes we are notified about it, and this also updates the value in our UI.
Now we have a full application which can scan Bluetooth devices, connect to them, display their services, read their values, update them and be notified about changes :)
As a reminder, the whole code for this project can be found here: https://github.com/jenow/flutter-ble

