Introduction
Here we are, the continuation of our series of articles on how to develop a real time messaging mobile app with React Native and Kuzzle Mobile ! It's a series of 3 articles:
- Part 1: Initialize the app and manage users login
- Part 2: Let’s code a real-time chat
- Part 3: Kuzzle Mobile good practices
This is part 2 (I strongly encourage you to read Part 1 before continuing). We will finally get to the heart of the matter and create our real time chat with Kuzzle Mobile.
Kuzzle Mobile is a ready-to-use, open-source, on-premises suite that allows you to build modern mobile applications in no time. It provides real-time capabilities and that's what we're going to see right now.
Previously
Let's do a quick reminder of what we have done in the previous section. First, we initialized our mobile application with Expo and in a second time, we prepared our backend by creating profiles and users as well as a collection to store messages from our messaging application. And finally we've implemented the login logic.
Once again, do not hesitate to go back and read some passages from part 1 if you need to refresh your memory.
One last little reminder: you must, if you haven't already done so, restart the whole Kuzzle stack with docker before continuing. To do this, launch your most beautiful terminal and go to the root of the project previously created and run :
docker-compose up
Also, always at the root of the project, to restart the build of the mobile application with Expo, simply execute this command:
npm start
Now we are ready to code !
Create a new screen
It’s time to take your code editor ! The first thing you need to do is to create a new screen for our application. This one will show to our users all the messages sent and it will allow us to send new messages.
Simply create a new file in the “components” folder and call it Chat.js.
for the moment, let's keep it minimalist, we will update it later:
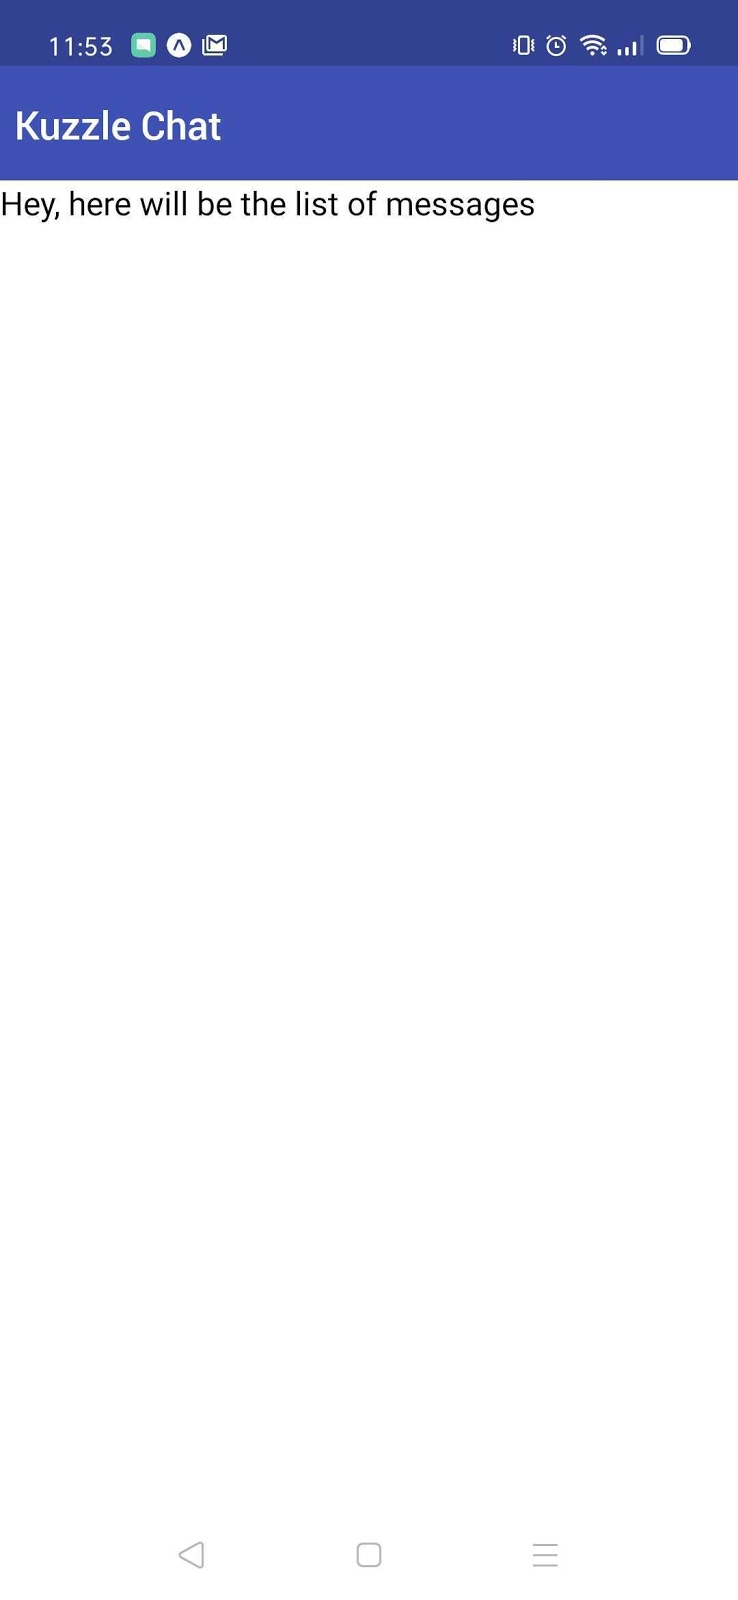
import React, { useState, useEffect } from "react";
import { Container, Toast, Input, Form, Item, Label, Text } from "native-base";
import kuzzle from "../services/kuzzle";

export default function Chat({ currentUsername }) {
 return (
   <Container style={{ flex: 1 }}>
     <Text>Hey, here will be the list of messages</Text>
   </Container>
 );
}
We only need some basic imports and, of course, the return statement which will be used for rendering the content.
Note that we set a currentUsername property to the component, we will need it to the following.
Now, go to your App.js file and import our new component :
import Chat from "./components/Chat";
We additionally need to update the renderApp() method to render our freshly imported component. Find the line with :
pageContent = <Text>Hello {username}</Text>;
And replace it with :
pageContent = <Chat currentUsername={username} />;
Now if you run the app, you can fill the login form and see the new screen if everything goes well.
Now that we're all set, we can move on to message fetching
Fetch messages from Kuzzle
Earliest, open the Chat.js file and add some state variables with the useState method :
const [messages, setMessages] = useState([]);
const [messagesFetched, setMessagesFetched] = useState(false);
The first one will be used to store messages in memory on our application. And the second one to validate the status of the action to retrieve messages from Kuzzle.
The next step is to implement the fetchMessages() function. To do this we will use the kuzzle-sdk and more specifically the controller document and the search action
const fetchMessages = async () => {
   try {
     // send search request with the kuzzle-sdk
     const results = await kuzzle.document.search(
       "messaging-app", // index
       "messages", // collection
       { sort: { "_kuzzle_info.createdAt": { order: "asc" } } }, // query body
       { size: 100 } // options
     );

     const fetchedMessages = results.hits.map((message) =>
       formatMessage(message)
     );

     setMessages(fetchedMessages);
     setMessagesFetched(true);
   } catch {
     showToast(
       "danger",
       "It looks like there is an error while fetching messages..."
     );
   }
 };
You can find the complete documentation about the search action here. But in a nutshell, we call the search method and we give to it some parameters :
- The index name, for our case it’s “messaging-app“ (we'd already created it in part one of this guide)
- The collection name or “messages“ (also created in the part one)
- The third parameter is the body of the query, it uses the Elasticsearch query syntax. Here we want to sort in an ascending way all the messages by their created date.
- The last one is for passing options to the search action. By example we set the size of the result to only 100 documents
If you remember the part 1, we created a collection names messages with a custom mapping like this :
{
 "content": { "type": "text" },
 "author": { "type": "keyword" }
}
As you see, to persist messages, we only need to save content of the message and of course the author.
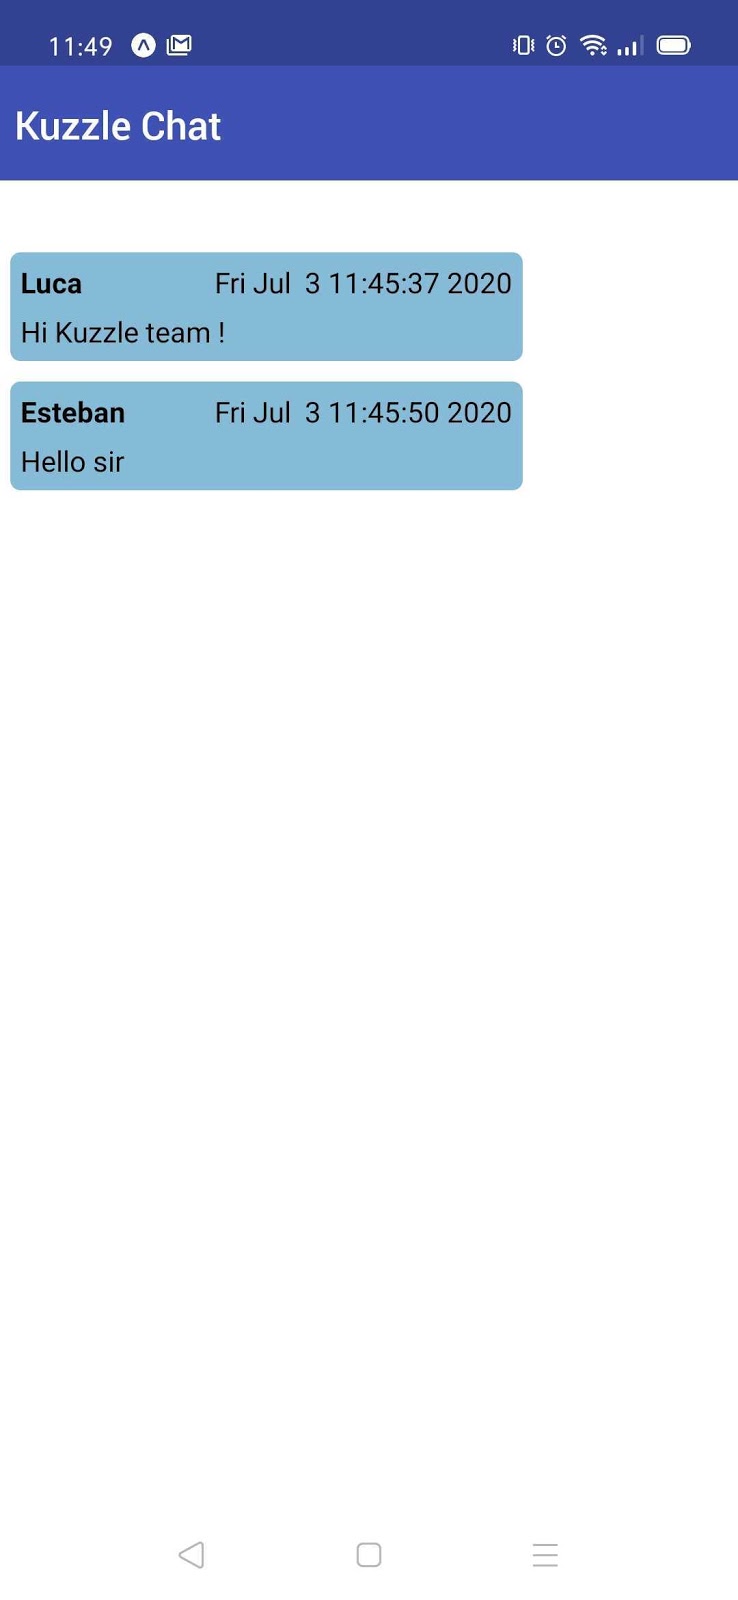
So basically, the result of the search action is an array containing hits. Each hit represents a document in our collection. Here an example of the response :
{
 "hits": [
   {
     "_id": "BLIRFHMBBug7TUOQMXt-",
     "_source": {
       "author": "Luca",
       "content": "Hi Kuzzle team !",
       "_kuzzle_info": {
         "author": "admin",
         "createdAt": 1593769537906,
         "updatedAt": 1593769607613,
         "updater": "admin"
       }
     }
   },
   {
     "_id": "BbIRFHMBBug7TUOQYnva",
     "_source": {
       "author": "Esteban",
       "content": "Hello sir",
       "_kuzzle_info": {
         "author": "admin",
         "createdAt": 1593769537906,
         "updatedAt": 1593769607613,
         "updater": "admin"
       }
     }
   }
 ]
}
Each hit contains the ID of the document and the source properties contain the body. You can also see that the Kuzzle add some metadata saved in the _kuzzle_info field
This example will help you to understand another function you have to add in this component :
const formatMessage = (message) => {
   return {
     id: message._id,
     author: message._source.author,
     content: message._source.content,
     date: new Date(message._source._kuzzle_info.createdAt).toLocaleString(),
   };
 };
The purpose of this function is to extract data from the result of the search action to have an object that can be easily exploited afterwards. For this we need the unique ID of the document, the content of the message, its author and the date of sending. Note that the sending date is automatically managed by Kuzzle and stored in the metadata of the document (in epoch timestamp).
Also, we need another function to show an error message if there is a problem with the fetch method, so add it to the Chat component :
const showToast = (type, message) => {
   return Toast.show({
     text: message,
     duration: 8000,
     type: type,
   });
 };
For the following we must add some React useEffect in the components to call and perform the search action :
useEffect(() => {
   if (!messagesFetched) {
     fetchMessages();
   }
 }, [messagesFetched]);
The next step is to update the return statement of our component :
return (
   <Container style={{ flex: 1 }}>
     <Container style={{ flex: 1 }}>
       <MessagesList messages={messages} currentUsername={currentUsername} />
     </Container>
   </Container>
 );
If you look closely you can see a new component called MessagesList. So… you know what to do ;)
Create a new file, call it MessagesList.js and don’t forget to import it in the Chat.js file
import MessagesList from "./MessagesList";
For the next step, let me introduce to you the custom MessageList component :
import React, { useRef } from "react";
import { StyleSheet, View, Text, FlatList } from "react-native";

export default function MessagesList({ messages, currentUsername }) {

 const flatListRef = useRef(); // used to reference the FlatList itself to perform scroll to end operation when new messages come in

 const renderFlatListItem = (item) => {
   return (
     <View>
       <View
         style={
           currentUsername === item.author
             ? styles.message__fromCurrentUser
             : styles.message__fromOthers
         }
       >
         <View style={styles.message__header}>
           <Text style={styles.message__author}>{item.author}</Text>
           <Text>{item.date}</Text>
         </View>
         <Text>{item.content}</Text>
       </View>
     </View>
   );
 };

 return (
   <FlatList
     style={styles.messagesList}
     data={messages}
     onContentSizeChange={() =>
       flatListRef.current.scrollToEnd({ animated: true })
     }
     renderItem={(item) => renderFlatListItem(item.item)}
     keyExtractor={(item) => item.id} // needed for the FlatList to set an unique key for each item of the list

     ref={flatListRef}
   />
 );
}

const styles = StyleSheet.create({
 messagesList: {
   marginTop: 30,
   marginBottom: 30,
   alignSelf: "stretch",
 },
 message__fromCurrentUser: {
   backgroundColor: "#9EE493",
   alignSelf: "flex-end",
   margin: 5,
   width: 250,
   padding: 5,
   borderRadius: 5,
 },
 message__fromOthers: {
   backgroundColor: "#86BBD8",
   alignSelf: "flex-start",
   margin: 5,
   width: 250,
   padding: 5,
   borderRadius: 5,
 },
 message__header: {
   flex: 1,
   flexDirection: "row",
   justifyContent: "space-between",
   marginBottom: 5,
 },
 message__author: {
   fontWeight: "bold",
 },
});
First lines are for imports, you're getting to know !
And right after, the definition of the component function. You can see that we declare two parameters : messages and currentUsername. Nothing more normal since it is the component that will take care of displaying our list of messages. It is also the component that will have the mission to separate the messages of the current user and those sent by other users. That's why we need these two parameters (aka props).
To do this we use a FlatList, a React Native component very handy in a mobile application to have scrollable lists. The main information you have to remember is that the component receives a list of all our messages (data property) and for each message, it will call the renderFlatListItem function (renderItem property).
Last point is about styling all that stuff ! We need different styles depending on whether the message comes from other users or from the current user. And above all we want our application to look good.
We're almost done with this part, there's just one tiny little detail left to work out. In the first part we created a profile called “standard-user” associated with the role “authentication”.
{
 // authentication role
 "controllers": {
   "auth": {
     "actions": {
       "*": true
     }
   }
 }
}
{
 // standard-user profile
 "rateLimit": 0,
 "policies": [
   {
     "roleId": "authentication"
   }
 ]
}
That means that any user associated with this profile only has the rights to the authentication controller. Any other call to another controller will be rejected by the Kuzzle permissions system.
A good practice here is to allow permissions as the development progresses. It may seem obvious, but believe me it's better not to have to manage all the permissions at once at the end of the development of your application, especially if it's quite large.
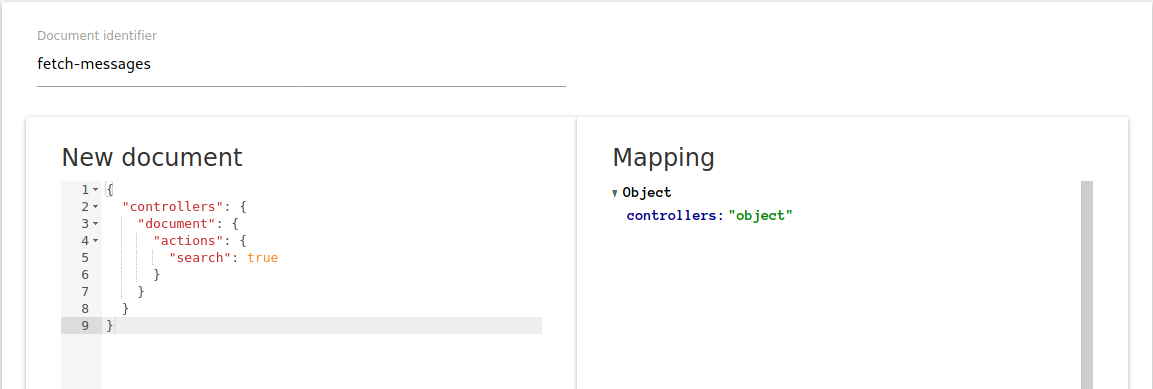
If we want to allow our users to perform search with the document controller, we need to create another role.
To do that, go back to the Kuzzle Admin Console and connect to your local environment.
Then go to the security page and then to the “Role” section by clicking on it in the left menu. Finally click on the “Create” button.
Give a name to the new role you want to create, something like “fetch-messages” will do the job. Next, fill the JSON textarea with and validate the form.
{
 "controllers": {
   "document": {
     "actions": {
       "search": true
     }
   }
 }
}
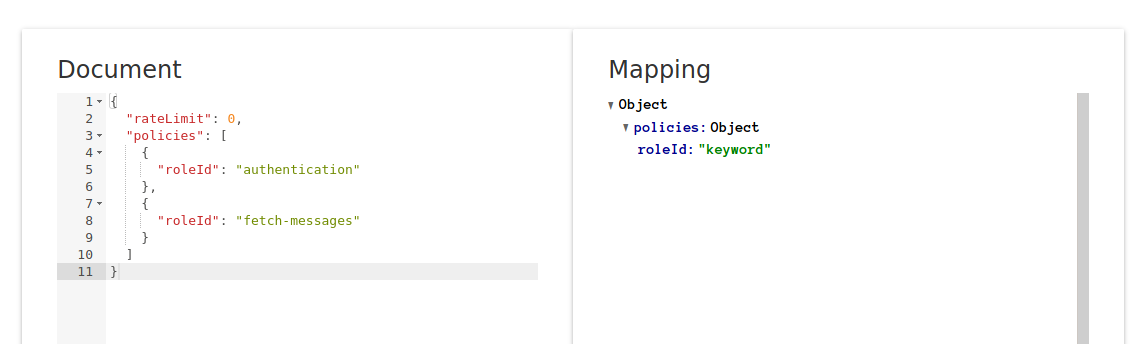
Once our new role is created, we need to associate it to the existing profile. Go to the “Profiles” section of the Admin Console and edit the “standard-user” profile to add the new role we just created :
{
 "rateLimit": 0,
 "policies": [
   {
     "roleId": "authentication"
   },
   {
     "roleId": "fetch-messages"
   }
 ]
Once done, we will be able to test the application. But before that, our "messages" collection is empty, we will use the Admin Console to create some documents in our collection.
Go to the “Data” pages on the Admin Console, select your index (messaging-app) then the collection (messages). You see here the list of the documents in the collection. Of course there's none at the moment. Click on the “Create a document” button.
No need to fill the “Document identifier” input, Kuzzle will generate a unique ID for the document. Just fill out the JSON textarea with some dummy content to test in the mobile application the recuperation of the messages. You just need to set a content and an author for the message :
{
 "content": "Hello sir",
 "author": "Esteban"
}
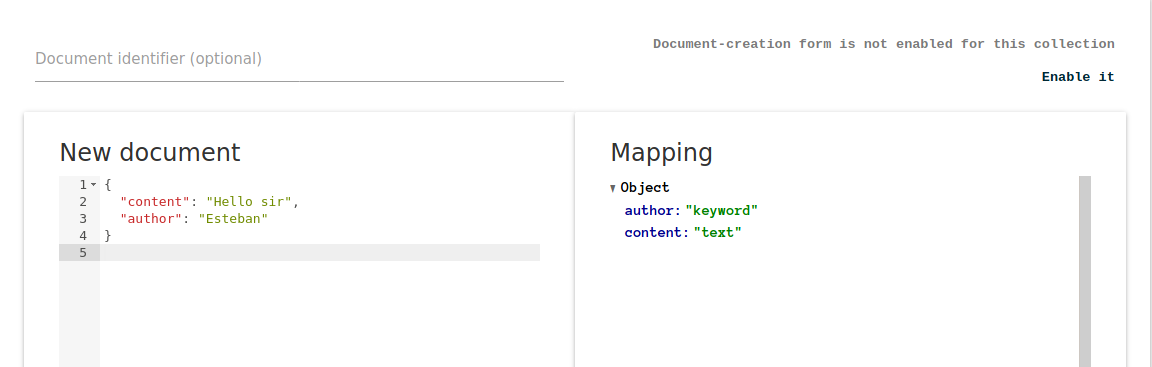
You can create as many messages as you want. Once completed, it’s time to test our application ! If everything works well you can see on your device all the messages freshly created.
Send messages
The following step is to allow our user to be able to send messages. First thing to do is to add a text input on the chat component. Open the Chat.js file and we will update the return statement of the component like this :
return (
   <Container style={{ flex: 1 }}>
     <Container style={{ flex: 1 }}>
       <MessagesList messages={messages} currentUsername={currentUsername} />
     </Container>
     <Form>
       <Item floatingLabel>
         <Label>Your message</Label>
         <Input
           ref={messageInputRef}
           onChangeText={(message) => setNewMessage(message)}
           onSubmitEditing={() => sendMessage()}
           value={newMessage}
         />
       </Item>
     </Form>
   </Container>
 );
We just added a Form component (provided by the Native-Base library) and an Input field.
Next, we need to declare a new state variable, which we'll call "newMessage". Also we will use the React Refs mechanisme to reference the text input. Just add these 2 lines on top of the components, just after the others state variables :
const [newMessage, setNewMessage] = useState(null);

const messageInputRef = React.createRef();
Once done, we need now to implement the sendMessage() method to be able to send the user's new message to Kuzzle Mobile.
const sendMessage = async () => {
   try {
     await kuzzle.document.create(
       "messaging-app",
       "messages",
       {
         content: newMessage,
         author: currentUsername,
       }
     );
     setNewMessage(null);
   } catch {
     showToast(
       "danger",
       "It looks like there is an error while sending a message..."
     );
   }
 };
This function uses the “document” controller provided by the Kuzzle-sdk and calls the “create” action. We give to it the index name, the collection name and the body of the document we want to create. Of course we empty the text input once done by setting a null value to the newMessage state.
If you remember the previous step, you know that we need to add a new role to authorize users to create documents. Again, go to the Admin Console and create a new role, call it “send-messages” and add this content to it :
{
 "controllers": {
   "document": {
     "actions": {
       "create": true
     }
   }
 }
}
Don’t forget to update the “standard-user” profile to associate it with this new role :
{
 "rateLimit": 0,
 "policies": [
   {
     "roleId": "authentication"
   },
   {
     "roleId": "fetch-messages"
   },
   {
     "roleId": "send-messages"
   }
 ]
}
Finally we can test the application and try to send a new message to Kuzzle Mobile.
But.. when you send a new message through the application… nothing happens… in fact, not really…
You can go to the Admin Console and check the list of documents present on the “messages” collection, you will see all the new messages that you just sent.
You will see how to see them and add real-time capabilities to the application on the next stage !
Real-time (finally) !
Here we are…finally… the parts where we will implement real-time abilities to our mobile application. Before we start let me explain to you how real-time works.
Kuzzle's real-time engine allows you to do Pub/Sub in dedicated communication channels called rooms.
The process is as follows:
- a customer subscribes to a particular room,
- a second customer posts a message in this room,
- the customer subscribing to the room receives a notification.
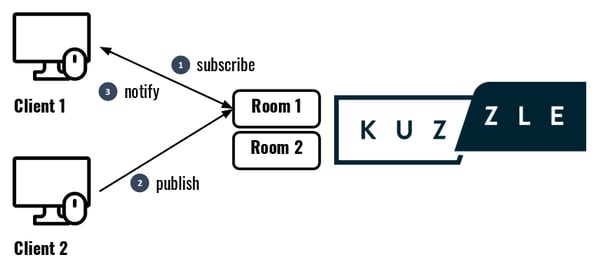
However, Kuzzle's real-time engine also allows you to subscribe to notifications corresponding to changes in the database, based on the same pattern, by sending notifications automatically in a dedicated room and that is exactly what we need !
If we relate this pattern to our case we want to subscribe to each new document created in the “messages” collection.
Subscription to a room is done via the realtime:subscribe method. It takes 4 parameters :
- name of an index,
- name of a collection,
- subscription filters contained in the body of the request.
- a callback function, called every time we receive a new notification in the room
Now that we know that, go to the Chat.js file and add the subscription function :
const subscribeToMessages = async () => {
   try {
     const roomId = await kuzzle.realtime.subscribe(
       "messaging-app",
       "messages",
       {},
       async (notification) => {
         if (
           notification.type !== "document" ||
           notification.action !== "create"
         ) {
           return;
         }
         setMessages([...messages, formatMessage(notification.result)]);
       }
     );

     setRoomId(roomId);
   } catch {
     showToast(
       "danger",
       "It looks like there is an error with the real-time messages subscription..."
     );
   }
 };
You can see that we check the type and the action of the notification to be sure to add new messages and not be polluted by other notifications (you can learn more about notifications here).
Now, add a new state variable to manage the state of the subscription :
const [roomId, setRoomId] = useState(null);
Once done, just update the useEffect hook to properly manage this subscription :
useEffect(() => {
   if (!messagesFetched) {
     fetchMessages();
   }

   if (messagesFetched && !roomId) {
     subscribeToMessages();
   }
 }, [messagesFetched, roomId]);
Before testing the application, we need to create another role, to allow users to subscribe to real time notifications.
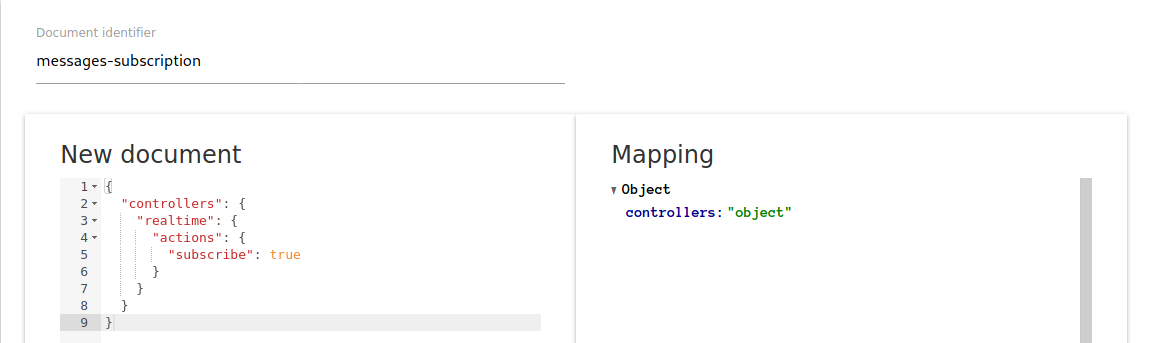
You know the drill, go to the Admin console and create a new role, call it “messages-subscription” and add it this content:
{
 "controllers": {
   "realtime": {
     "actions": {
       "subscribe": true
     }
   }
 }
}
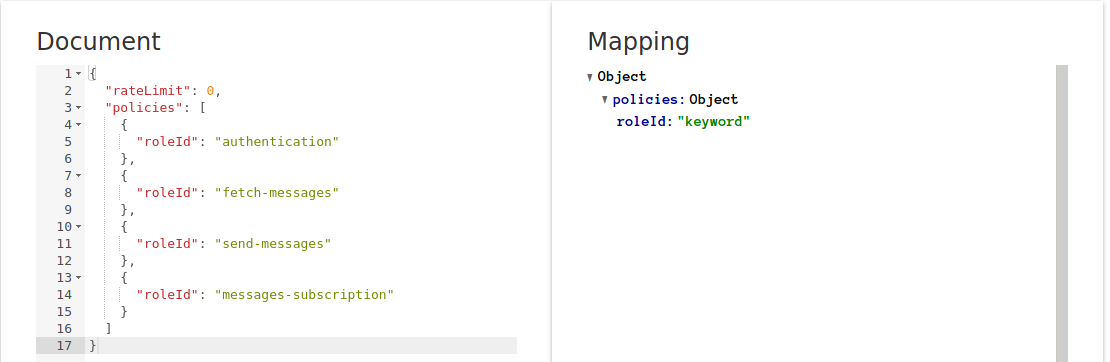
And update the “standard-user” profile like this :
{
 "rateLimit": 0,
 "policies": [
   {
     "roleId": "authentication"
   },
   {
     "roleId": "fetch-messages"
   },
   {
     "roleId": "send-messages"
   },
   {
     "roleId": "messages-subscription"
   }
 ]
}
It's now time to test our application to make sure everything is working as expected. If you did follow all the steps you can now send messages through the application and see them appear on the screen.
You can also verify the documents list on the Admin console and why not create a new document to see it show up on your mobile.

Conclusion
Thus ends part 2 of our series of articles on React Native and Kuzzle Mobile. We have seen how to perform search actions on documents. But above all how to subscribe to real-time notifications. This last point really adds value to your mobile application and especially how it's quite simple to set it up.
Once again, I would like to thank the entire Kuzzle team for reviewing this article. Let's meet up for the next and last part and dive into the good practices of using Kuzzle Mobile and finally finish our application.

